在介绍EMQ之前,先对比一下几个不同的mqtt消息服务器
| Server | QoS 0 | QoS 1 | QoS 2 | auth | bridge | $SYS | SSL | dynamic topics | cluster | websockets | plugin system |
|---|---|---|---|---|---|---|---|---|---|---|---|
| 2lemetry | ✔ | ✔ | ✔ | ✔ | ✔ | § | ✔ | ✔ | ✔ | ✔ | ✘ |
| Apache ActiveMQ | ✔ | ✔ | ✔ | ✔ | ✘ | ✘ | ✔ | ✔ | ✔ | ✔ | ✔ |
| Apache ActiveMQ Artemis | ✔ | ✔ | ✔ | ✔ | ✘ | ✘ | ✔ | ✔ | ✔ | ✔ | ✔ |
| Bevywise IoT Platform | ✔ | ✔ | ✔ | ✔ | rm | ✔ | ✔ | ✔ | ✔ | ✔ | rm |
| emitter | ✔ | § | ✘ | ✔ | ✘ | ✘ | ✔ | ✔ | ✔ | ✔ | ✘ |
| 🌟emqttd | ✔ | ✔ | ✔ | ✔ | ✔ | ✔ | ✔ | ✔ | ✔ | ✔ | ✔ |
| flespi | ✔ | ✔ | ✔ | ✔ | ✘ | ✘ | ✔ | ✔ | ✔ | ✔ | ✘ |
| GnatMQ | ✔ | ✔ | ✔ | ✔ | ✘ | ✘ | ✘ | ✔ | ✘ | ✘ | ✘ |
| HBMQTT | ✔ | ✔ | ✔ | ✔ | ✘ | ✔ | ✔ | ✔ | ✘ | ✔ | ✔ |
| HiveMQ | ✔ | ✔ | ✔ | ✔ | ✔ | ✔ | ✔ | ✔ | ✔ | ✔ | ✔ |
| IBM MessageSight | ✔ | ✔ | ✔ | ✔ | ✘ | ✔ | ✔ | ✔ | § | ✔ | ✘ |
| JoramMQ | ✔ | ✔ | ✔ | ✔ | ✔ | ✔ | ✔ | ✔ | ✔ | ✔ | ✔ |
| Mongoose | ✔ | ✔ | ? | ? | ? | ? | ? | ? | ? | ? | ? |
| moquette | ✔ | ✔ | ✔ | ✔ | ? | ? | ✔ | ? | rm | ✔ | ✘ |
| mosca | ✔ | ✔ | ✘ | ✔ | ? | ? | ? | ? | ✘ | ✔ | ✘ |
| mosquitto | ✔ | ✔ | ✔ | ✔ | ✔ | ✔ | ✔ | ✔ | § | ✔ | ✔ |
| MQTT.js | ✔ | ✔ | ✔ | § | ✘ | ✘ | ✔ | ✔ | ✘ | ✔ | ✘ |
| MqttWk | ✔ | ✔ | ✔ | ✔ | ✔ | ? | ✔ | ✔ | ✔ | ✔ | ✘ |
| RabbitMQ | ✔ | ✔ | ✘ | ✔ | ✘ | ✘ | ✔ | ✔ | ? | ? | ? |
| RSMB | ✔ | ✔ | ✔ | ✔ | ✔ | ✔ | ✘ | ✔ | ✘ | ✘ | ? |
| Software AG Universal Messaging | ✔ | ✔ | ✔ | ✔ | ✘ | ✘ | ✔ | ✔ | ✔ | rm | ✘ |
| Solace | ✔ | ✔ | ✘ | ✔ | § | ✔ | ✔ | ✔ | ✔ | ✔ | ✘ |
| SwiftMQ | ✔ | ✔ | ✔ | ✔ | ✔ | ✘ | ✔ | ✔ | ✔ | ✘ | ✔ |
| Trafero Tstack | ✔ | ✔ | ✔ | ✔ | ✘ | ✘ | ✔ | ✔ | ✘ | ✘ | ✘ |
| VerneMQ | ✔ | ✔ | ✔ | ✔ | ✔ | ✔ | ✔ | ✔ | ✔ | ✔ | ✔ |
| WebSphere MQ | ✔ | ✔ | ✔ | ✔ | ✔ | ✔ | ✔ | ✔ | ? | ? | ? |
Key: ✔ supported ✘ not supported ? unknown § see limitations rm roadmap (planned)
在众多的MQTT Broker中,EMQ支持的功能很全,是一个用Scale开发的开源项目,并且拥有一个有基本调试功能的后台,最总要的是它能进行插件开发,这是我选择EMQ作为我的MQTT Broker的重要原因。
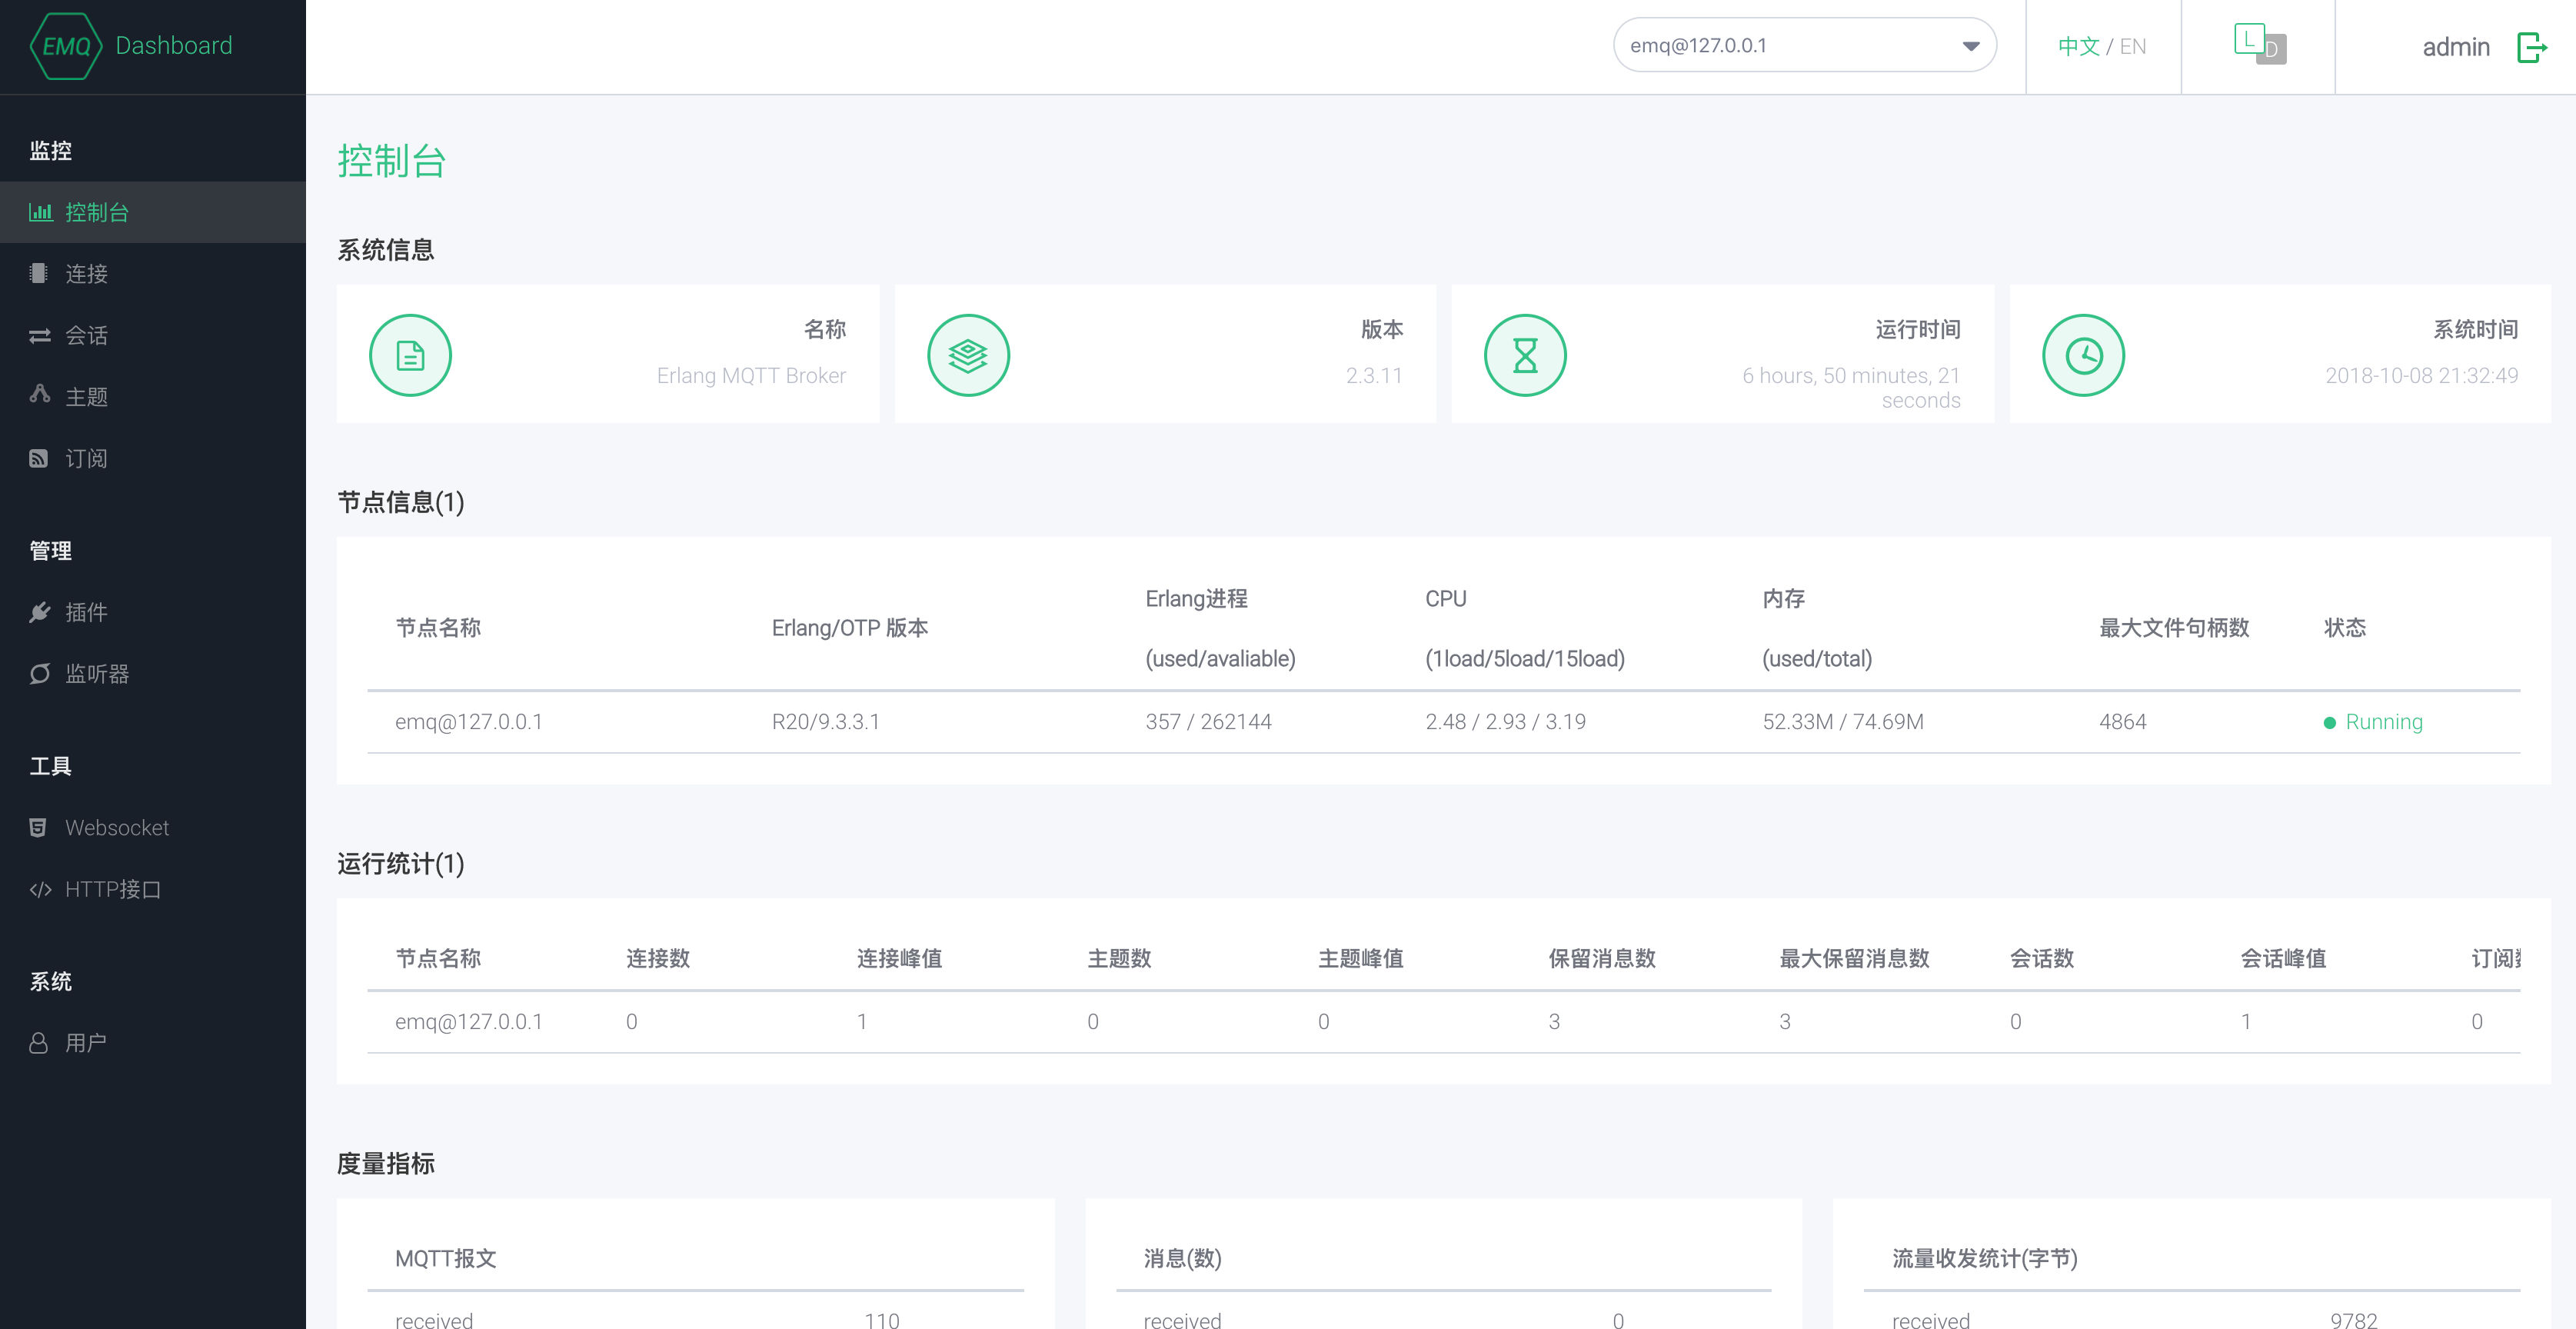
EMQ 控制台
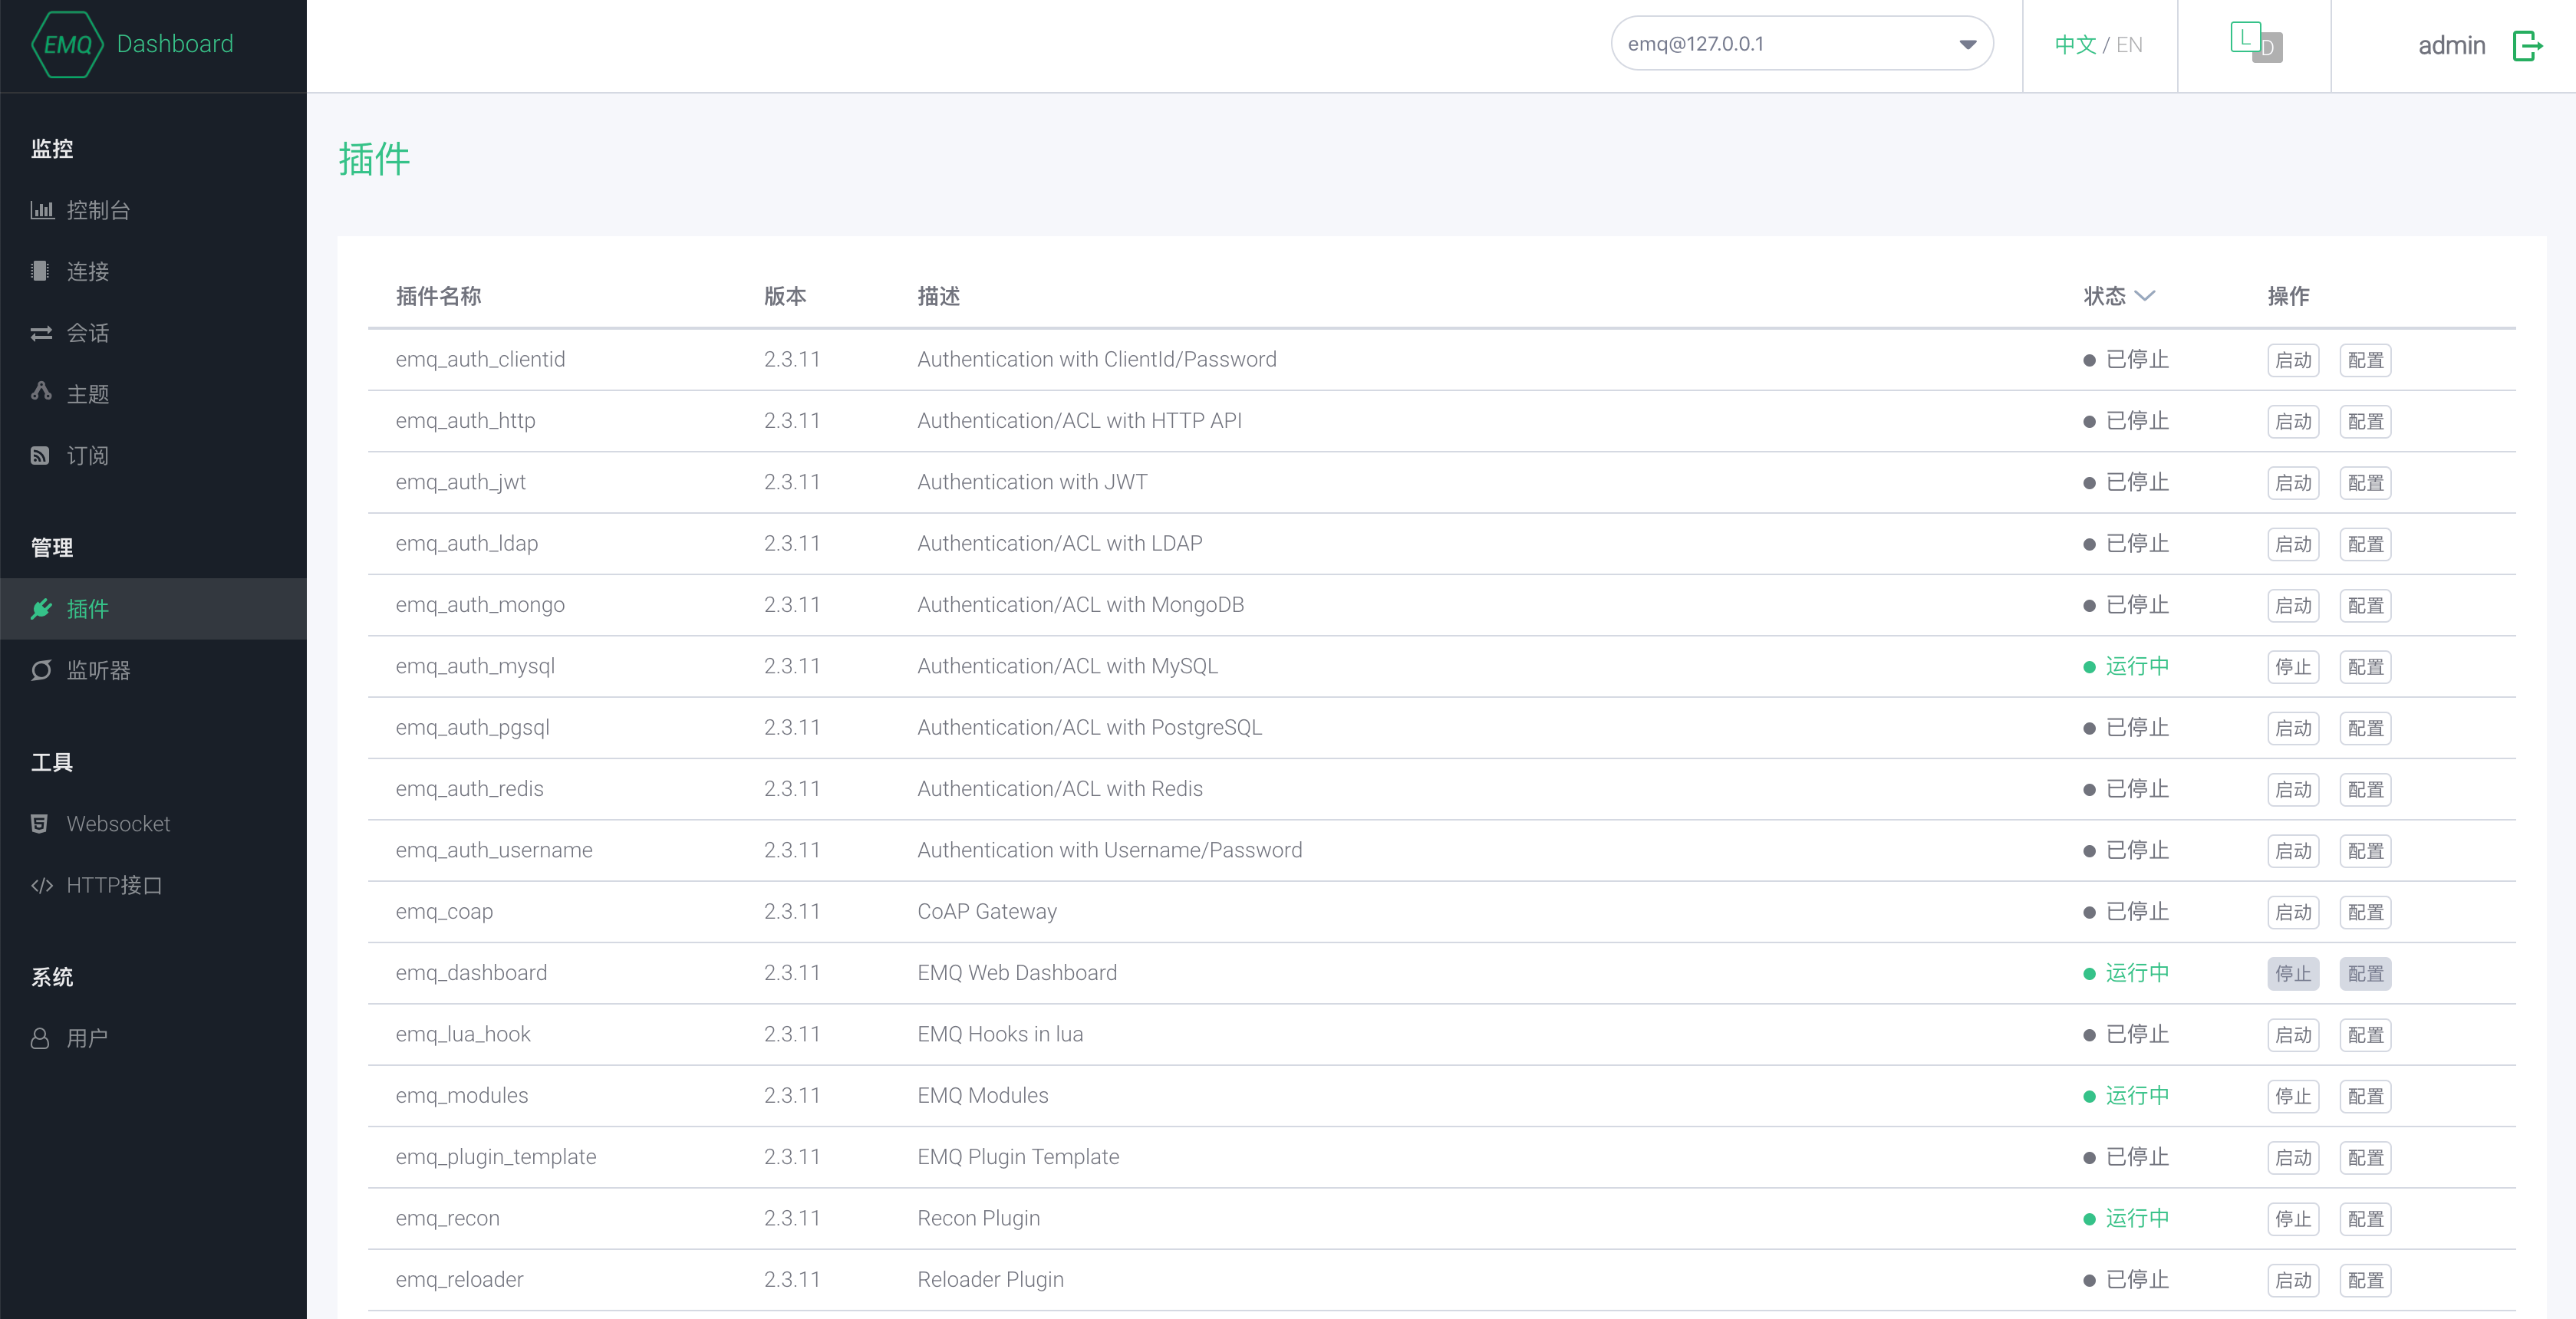
EMQ 插件管理
官方提供了各式各样平台的编译后的可运行程序、Docker镜像,当然也提供源文件自行编译【下载页面】。
我的开发环境为Mac,所以这里我选择OSX版本的EMQ。
将zip文件下载后,解压到目录下,然后运行:
./bin/emqttd star
等待一会后,控制台会输出:
emqttd 2.3.11 is started successfully!
就是这么简单。
打开浏览器通过访问127.0.0.1:18083进入控制台,默认账号密码为[admin, public]。
MySQL 认证/访问控制插件,基于 MySQL 库表认证鉴权: https://github.com/emqtt/emq-auth-MySQL
在官方提供的EMQ中已经包含了,MySQL 鉴权插件。 首先我们需要修改MySQL鉴权插件的配置文件,并填写好相应的配置:
vi etc/plugins/emq_auth_mysql.conf
然后我们只需要在EMQ的目录下运行:
./bin/emqttd_ctl plugins load emq_auth_mysql
控制台输出:
Start apps: [emq_auth_mysql]
Plugin emq_auth_mysql loaded successfully.
插件就加载成功了。
注意:这里若出现以下错误:
load plugin error:  {emq_auth_mysql,
                     {bad_return,
                      { {emq_auth_mysql_app,start,[normal,[]]  },
                       {'EXIT',
                        { {badmatch,
                          {error,
                           {shutdown,
                            {failed_to_start_child,emq_auth_mysql,
                             {shutdown,
                              {failed_to_start_child,worker_sup,
                               {shutdown,
                                {failed_to_start_child,
                                 {worker,1  },
                                 {1045,<<"28000">>,
                                 <<"Access denied for user ''@'localhost' (using password: NO)">>  }  }  }  }  }  }  }  }  },
                        [ {emq_auth_mysql_app,start,2,
                          [ {file,"src/emq_auth_mysql_app.erl"  }, {line,33  }]  },
                          {application_master,start_it_old,4,
                          [ {file,"application_master.erl"  }, {line,273  }]  }]  }  }  }  }  }
需要删除data/configs/目录下的所有文件,该目录下的文件为EMQ的配置缓存,删除后重新运行./bin/emqttd_ctl plugins load emq_auth_mysql即可。
又官方文档的SQL代码可以知道,鉴权主要由两个表组成。
用户表
    CREATE TABLE `mqtt_user` (
      `id` int(11) unsigned NOT NULL AUTO_INCREMENT,
      `username` varchar(100) DEFAULT NULL,
      `password` varchar(100) DEFAULT NULL,
      `salt` varchar(35) DEFAULT NULL,
      `is_superuser` tinyint(1) DEFAULT 0,
      `created` datetime DEFAULT NULL,
      PRIMARY KEY (`id`),
      UNIQUE KEY `mqtt_username` (`username`)
    ) ENGINE=MyISAM DEFAULT CHARSET=utf8;
Topic权限控制表
    CREATE TABLE `mqtt_acl` (
      `id` int(11) unsigned NOT NULL AUTO_INCREMENT,
      `allow` int(1) DEFAULT NULL COMMENT '0: deny, 1: allow',
      `ipaddr` varchar(60) DEFAULT NULL COMMENT 'IpAddress',
      `username` varchar(100) DEFAULT NULL COMMENT 'Username',
      `clientid` varchar(100) DEFAULT NULL COMMENT 'ClientId',
      `access` int(2) NOT NULL COMMENT '1: subscribe, 2: publish, 3: pubsub',
      `topic` varchar(100) NOT NULL DEFAULT '' COMMENT 'Topic Filter',
      PRIMARY KEY (`id`)
    ) ENGINE=InnoDB DEFAULT CHARSET=utf8;
INSERT INTO `mqtt_acl` (`id`, `allow`, `ipaddr`, `username`, `clientid`, `access`, `topic`) VALUES (1,1,NULL,'$all',NULL,2,'#'), (2,0,NULL,'$all',NULL,1,'$SYS/#'), (3,0,NULL,'$all',NULL,1,'eq #'), (5,1,'127.0.0.1',NULL,NULL,2,'$SYS/#'), (6,1,'127.0.0.1',NULL,NULL,2,'#'), (7,1,NULL,'dashboard',NULL,1,'$SYS/#');
接下来我们改造以下表结构和默认配置文件中的SQL查询语句,来实现用户权限组、用户账户有效判断、用户密码有效期功能。
这里使用Django ORM进行表结构设计和实现,这里使用的Django版本为2.0.7,代码如下:
from django.db import models
from django.utils.translation import ugettext_lazy as _

class BaseFieldsModal(models.Model):
    """
    模型基础类
    """

    create_date = models.DateTimeField(verbose_name=_('create date'), blank=True, null=True, auto_now_add=True)
    update_date = models.DateTimeField(verbose_name=_('update date'), blank=True, null=True, auto_now=True)

    class Meta:
        abstract = True

class AccessControl(BaseFieldsModal):
    """
    Topic权限控制表模型
    """
    allow_choices = [(0, _('deny')), (1, _('allow'))]
    allow = models.IntegerField(
        verbose_name=_('allow access'),
        choices=allow_choices,
        blank=False, null=False, default=0
    )
    ip_address = models.CharField(verbose_name=_('ip address'), max_length=60, blank=True, null=True)
    client_id = models.CharField(verbose_name=_('client id'), max_length=100, blank=True, null=True)

    access_choices = [(1, _('subscribe')), (2, _('publish')), (3, _('pub&sub'))]
    access = models.IntegerField(
        verbose_name=_('access type'),
        choices=access_choices,
        blank=False, null=False
    )
    # (3, 'pub&sub') not work ?
    topic = models.CharField(max_length=100, blank=False, null=False)

    is_active = models.BooleanField(verbose_name=_('active'), blank=True, null=False, default=True, db_index=True)

    class Meta:
        verbose_name = _('access control')
        verbose_name_plural = _('access control')

    def __str__(self):
        return _('{allow_or_deny} access to {access_type} {topic}'
                 ' from {ip} with client id: {client_id}').format(
            allow_or_deny=dict(self.allow_choices)[self.allow],
            access_type=dict(self.access_choices)[self.access],
            topic=self.topic,
            ip=self.ip_address if self.ip_address else _('all ip'),
            client_id=self.client_id if self.client_id else _('any client id')
        )


class UserGroup(BaseFieldsModal):
    """
    用户组表模型
    """
    group_name = models.CharField(verbose_name=_('group name'), unique=True, max_length=100, db_index=True)
    is_active = models.BooleanField(verbose_name=_('active'), blank=True, null=False, default=True, db_index=True)
    access_control_ids = models.ManyToManyField(
        verbose_name=_('access control'), to=AccessControl
    )

    class Meta:
        verbose_name = _('group')
        verbose_name_plural = _('groups')

    def __str__(self):
        return str(self.group_name)


class User(BaseFieldsModal):
    """
    用户表模型
    """
    username = models.CharField(verbose_name=_('username'), unique=True, max_length=100, blank=False, null=False,
                                db_index=True)
    password = models.CharField(verbose_name=_('password'), max_length=100, blank=False, null=False)
    salt = models.CharField(verbose_name=_('salt'), max_length=35, blank=True, null=True)
    is_superuser = models.IntegerField(
        verbose_name=_('is superuser'),
        choices=[(0, _('normal user')), (1, _('superuser'))],
        blank=False, null=False, default=0, db_index=True
    )
    is_active = models.BooleanField(verbose_name=_('active'), blank=True, null=False, default=True, db_index=True)
    access_control_ids = models.ManyToManyField(
        verbose_name=_('access control'), to=AccessControl
    )
    user_group_ids = models.ManyToManyField(verbose_name=_('user group'), to=UserGroup)
    password_will_expire = models.BooleanField(verbose_name=_('the password will expire'), blank=True, null=False,
                                               default=False, db_index=True)
    password_expiration = models.IntegerField(verbose_name=_('password expire timestamp'), blank=True, null=False,
                                              default=0, db_index=True)

    class Meta:
        verbose_name = _('user')
        verbose_name_plural = _('users')

    def __str__(self):
        return str(self.username)
最后生成的表结构ER图为:
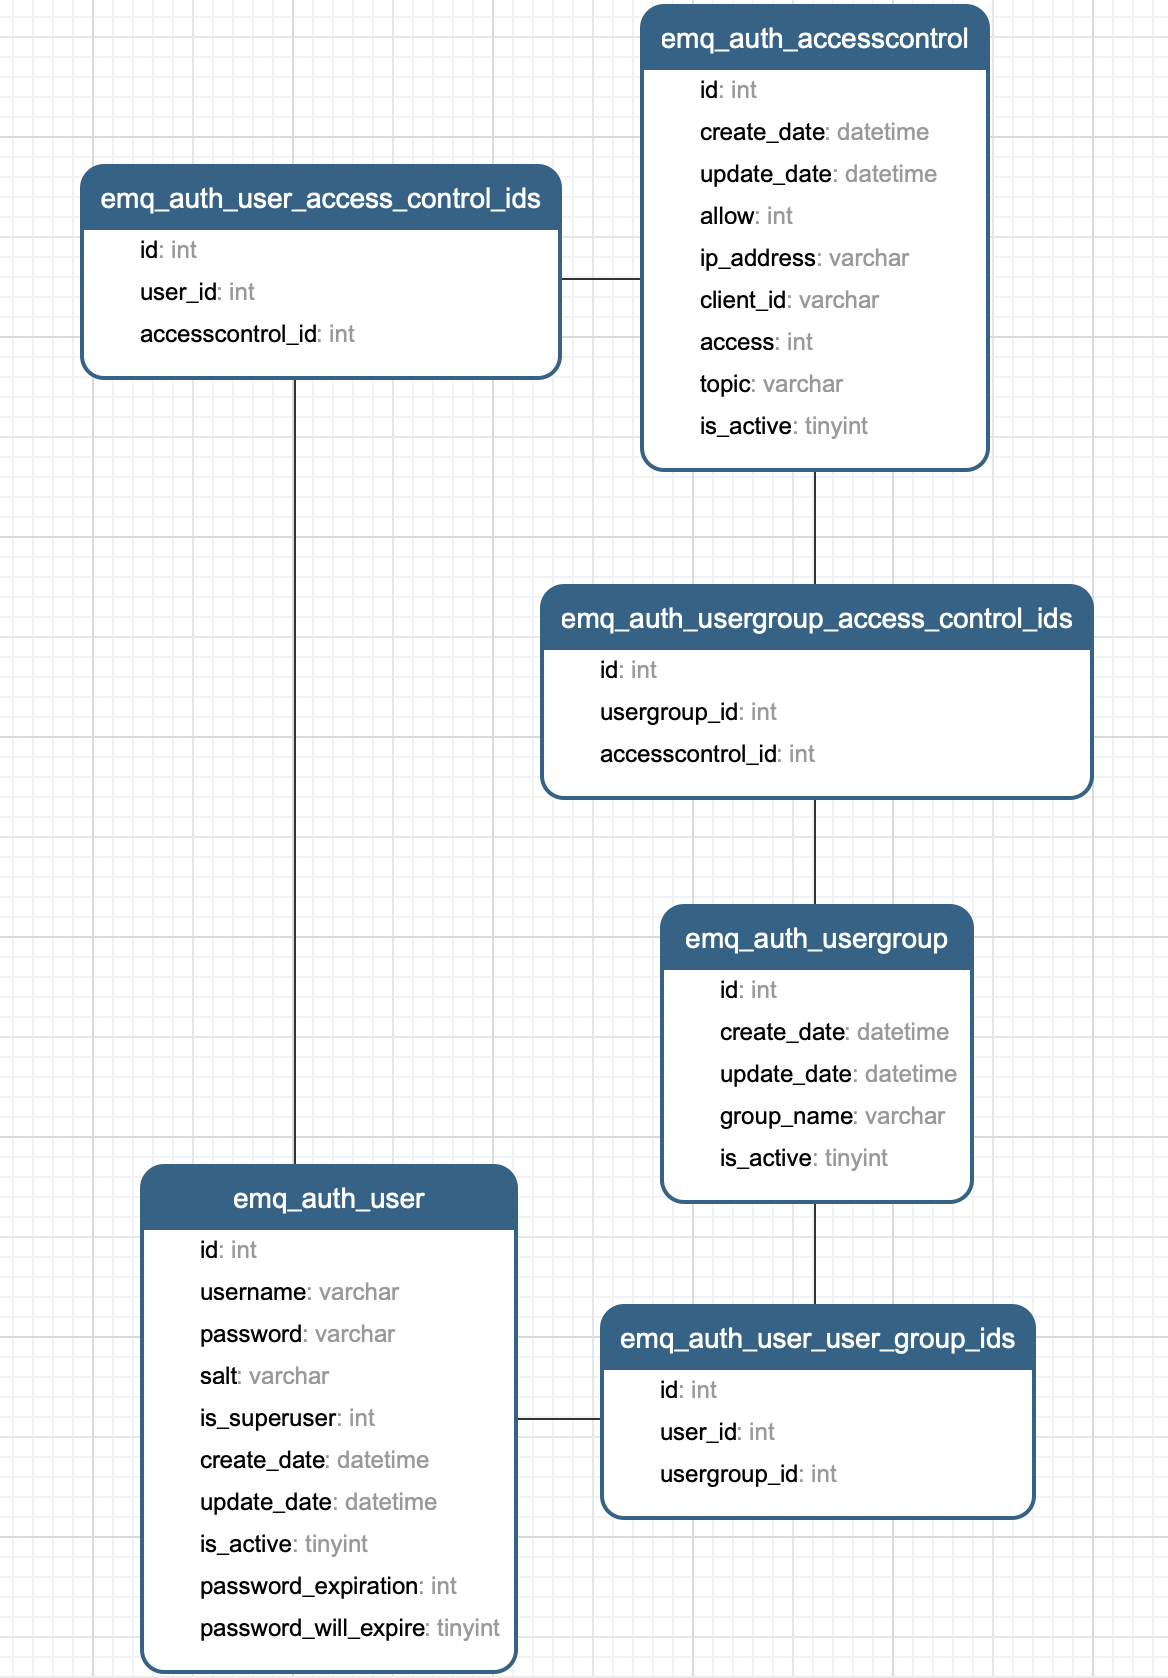
生成表结构了,我们还需要改造插件配置文件中的SQL语句,需要根据用户组、用户有效期和用户密码有效期来判断用户鉴权是否有效。
改造后对应的SQL如下:
SELECT
 (
 CASE

         WHEN is_active = 1
         AND ( password_will_expire = 0 OR ( password_will_expire = 1 AND password_expiration > unix_timestamp( now( ) ) ) ) THEN
             PASSWORD ELSE 'error'
         END
         ) AS PASSWORD
     FROM
         emq_auth_user
     WHERE
     username = '%u'
 LIMIT 1
SELECT
 is_superuser
FROM
 emq_auth_user
WHERE
 username = '%u'
 AND is_active = 1
 LIMIT 1
SELECT
 c.allow,
 c.ip_address AS ipaddr,
 a.username,
 c.client_id AS clientid,
 c.access,
 c.topic
FROM
 ( SELECT * FROM emq_auth_user WHERE ( username = '%u' OR username = '$all' ) AND is_active = 1 ) a,
 emq_auth_user_access_control_ids b,
 emq_auth_accesscontrol c
WHERE
 ( a.id = b.user_id AND b.accesscontrol_id = c.id AND c.is_active = 1 ) UNION ALL
SELECT
 c.allow,
 c.ip_address AS ipaddr,
 a.username,
 c.client_id AS clientid,
 c.access,
 c.topic
FROM
 ( SELECT * FROM emq_auth_user WHERE ( username = '%u' OR username = '$all' ) AND is_active = 1 ) a,
 emq_auth_user_user_group_ids b,
 emq_auth_accesscontrol c,
 emq_auth_usergroup_access_control_ids d,
 emq_auth_usergroup e
WHERE
 (
     a.id = b.user_id
     AND b.usergroup_id = e.id
     AND e.is_active = 1
     AND b.usergroup_id = d.usergroup_id
     AND d.accesscontrol_id = c.id
 AND c.is_active = 1
 )
当然这里同样需要插入默认的权限控制数据
[
{  "allow  ": 0,   "ip_address  ": "",   "access  ": 1,   "topic  ":   "#  "},
{  "allow  ": 0,   "ip_address  ": "",   "access  ": 2,   "topic  ":   "#  "},
{  "allow  ": 0,   "ip_address  ": "",   "access  ": 2,   "topic  ":   "$SYS/#  "},
{  "allow  ": 0,   "ip_address  ": "",   "access  ": 1,   "topic  ":   "$SYS/#  "},
{  "allow  ": 0,   "ip_address  ": "",   "access  ": 1,   "topic  ":   "eq #  "}
]
最后的emq_auth_mysql.conf配置文件如下:
##--------------------------------------------------------------------
## MySQL Auth/ACL Plugin
##--------------------------------------------------------------------

## MySQL server address.
##
## Value: Port | IP:Port
##
## Examples: 3306, 127.0.0.1:3306, localhost:3306
auth.mysql.server = 127.0.0.1:3306

## MySQL pool size.
##
## Value: Number
auth.mysql.pool = 8

## MySQL username.
##
## Value: String
auth.mysql.username = root

## MySQL password.
##
## Value: String
auth.mysql.password = root

## MySQL database.
##
## Value: String
auth.mysql.database = db_name

## Variables: %u = username, %c = clientid

## Authentication query.
##
## Note that column names should be 'password' and 'salt' (if used).
## In case column names differ in your DB - please use aliases,
## e.g. "my_column_name as password".
##
## Value: SQL
##
## Variables:
##  - %u: username
##  - %c: clientid
##
auth.mysql.auth_query = SELECT (CASE WHEN is_active=1 AND (password_will_expire=0 OR (password_will_expire=1 AND password_expiration> unix_timestamp(now()))) THEN password ELSE 'error' END) AS password FROM emq_auth_user WHERE username='%u' LIMIT 1
## auth.mysql.auth_query = select password_hash as password from mqtt_user where username = '%u' limit 1

## Password hash.
##
## Value: plain | md5 | sha | sha256 | bcrypt
auth.mysql.password_hash = sha256

## sha256 with salt prefix
## auth.mysql.password_hash = salt,sha256

## bcrypt with salt only prefix
## auth.mysql.password_hash = salt,bcrypt

## sha256 with salt suffix
## auth.mysql.password_hash = sha256,salt

## pbkdf2 with macfun iterations dklen
## macfun: md4, md5, ripemd160, sha, sha224, sha256, sha384, sha512
## auth.mysql.password_hash = pbkdf2,sha256,1000,20

## Superuser query.
##
## Value: SQL
##
## Variables:
##  - %u: username
##  - %c: clientid
auth.mysql.super_query = SELECT is_superuser FROM emq_auth_user WHERE username = '%u' AND is_active = 1 LIMIT 1

## ACL query.
##
## Value: SQL
##
## Variables:
##  - %a: ipaddr
##  - %u: username
##  - %c: clientid
auth.mysql.acl_query = SELECT c.allow, c.ip_address AS ipaddr, a.username, c.client_id AS clientid, c.access , c.topic FROM ( SELECT * FROM emq_auth_user WHERE (username = '%u' OR username = '$all') AND is_active = 1 ) a, emq_auth_user_access_control_ids b, emq_auth_accesscontrol c WHERE (a.id = b.user_id AND b.accesscontrol_id = c.id AND c.is_active = 1) UNION ALL SELECT c.allow, c.ip_address AS ipaddr, a.username, c.client_id AS clientid, c.access , c.topic FROM ( SELECT * FROM emq_auth_user WHERE (username = '%u' OR username = '$all') AND is_active = 1 ) a, emq_auth_user_user_group_ids b, emq_auth_accesscontrol c, emq_auth_usergroup_access_control_ids d, emq_auth_usergroup e WHERE (a.id = b.user_id AND b.usergroup_id = e.id AND e.is_active = 1 AND b.usergroup_id = d.usergroup_id AND d.accesscontrol_id = c.id AND c.is_active = 1)
最后只需要重启EMQ即可,在EMQ目录下输入:
./bin/emqttd restart
出现ok字样则重启成功。
要查看emq_auth_mysql插件是否配置成功,可以打开EMQ控制台,选择插件菜单后,点击emq_auth_mysql配置按钮。
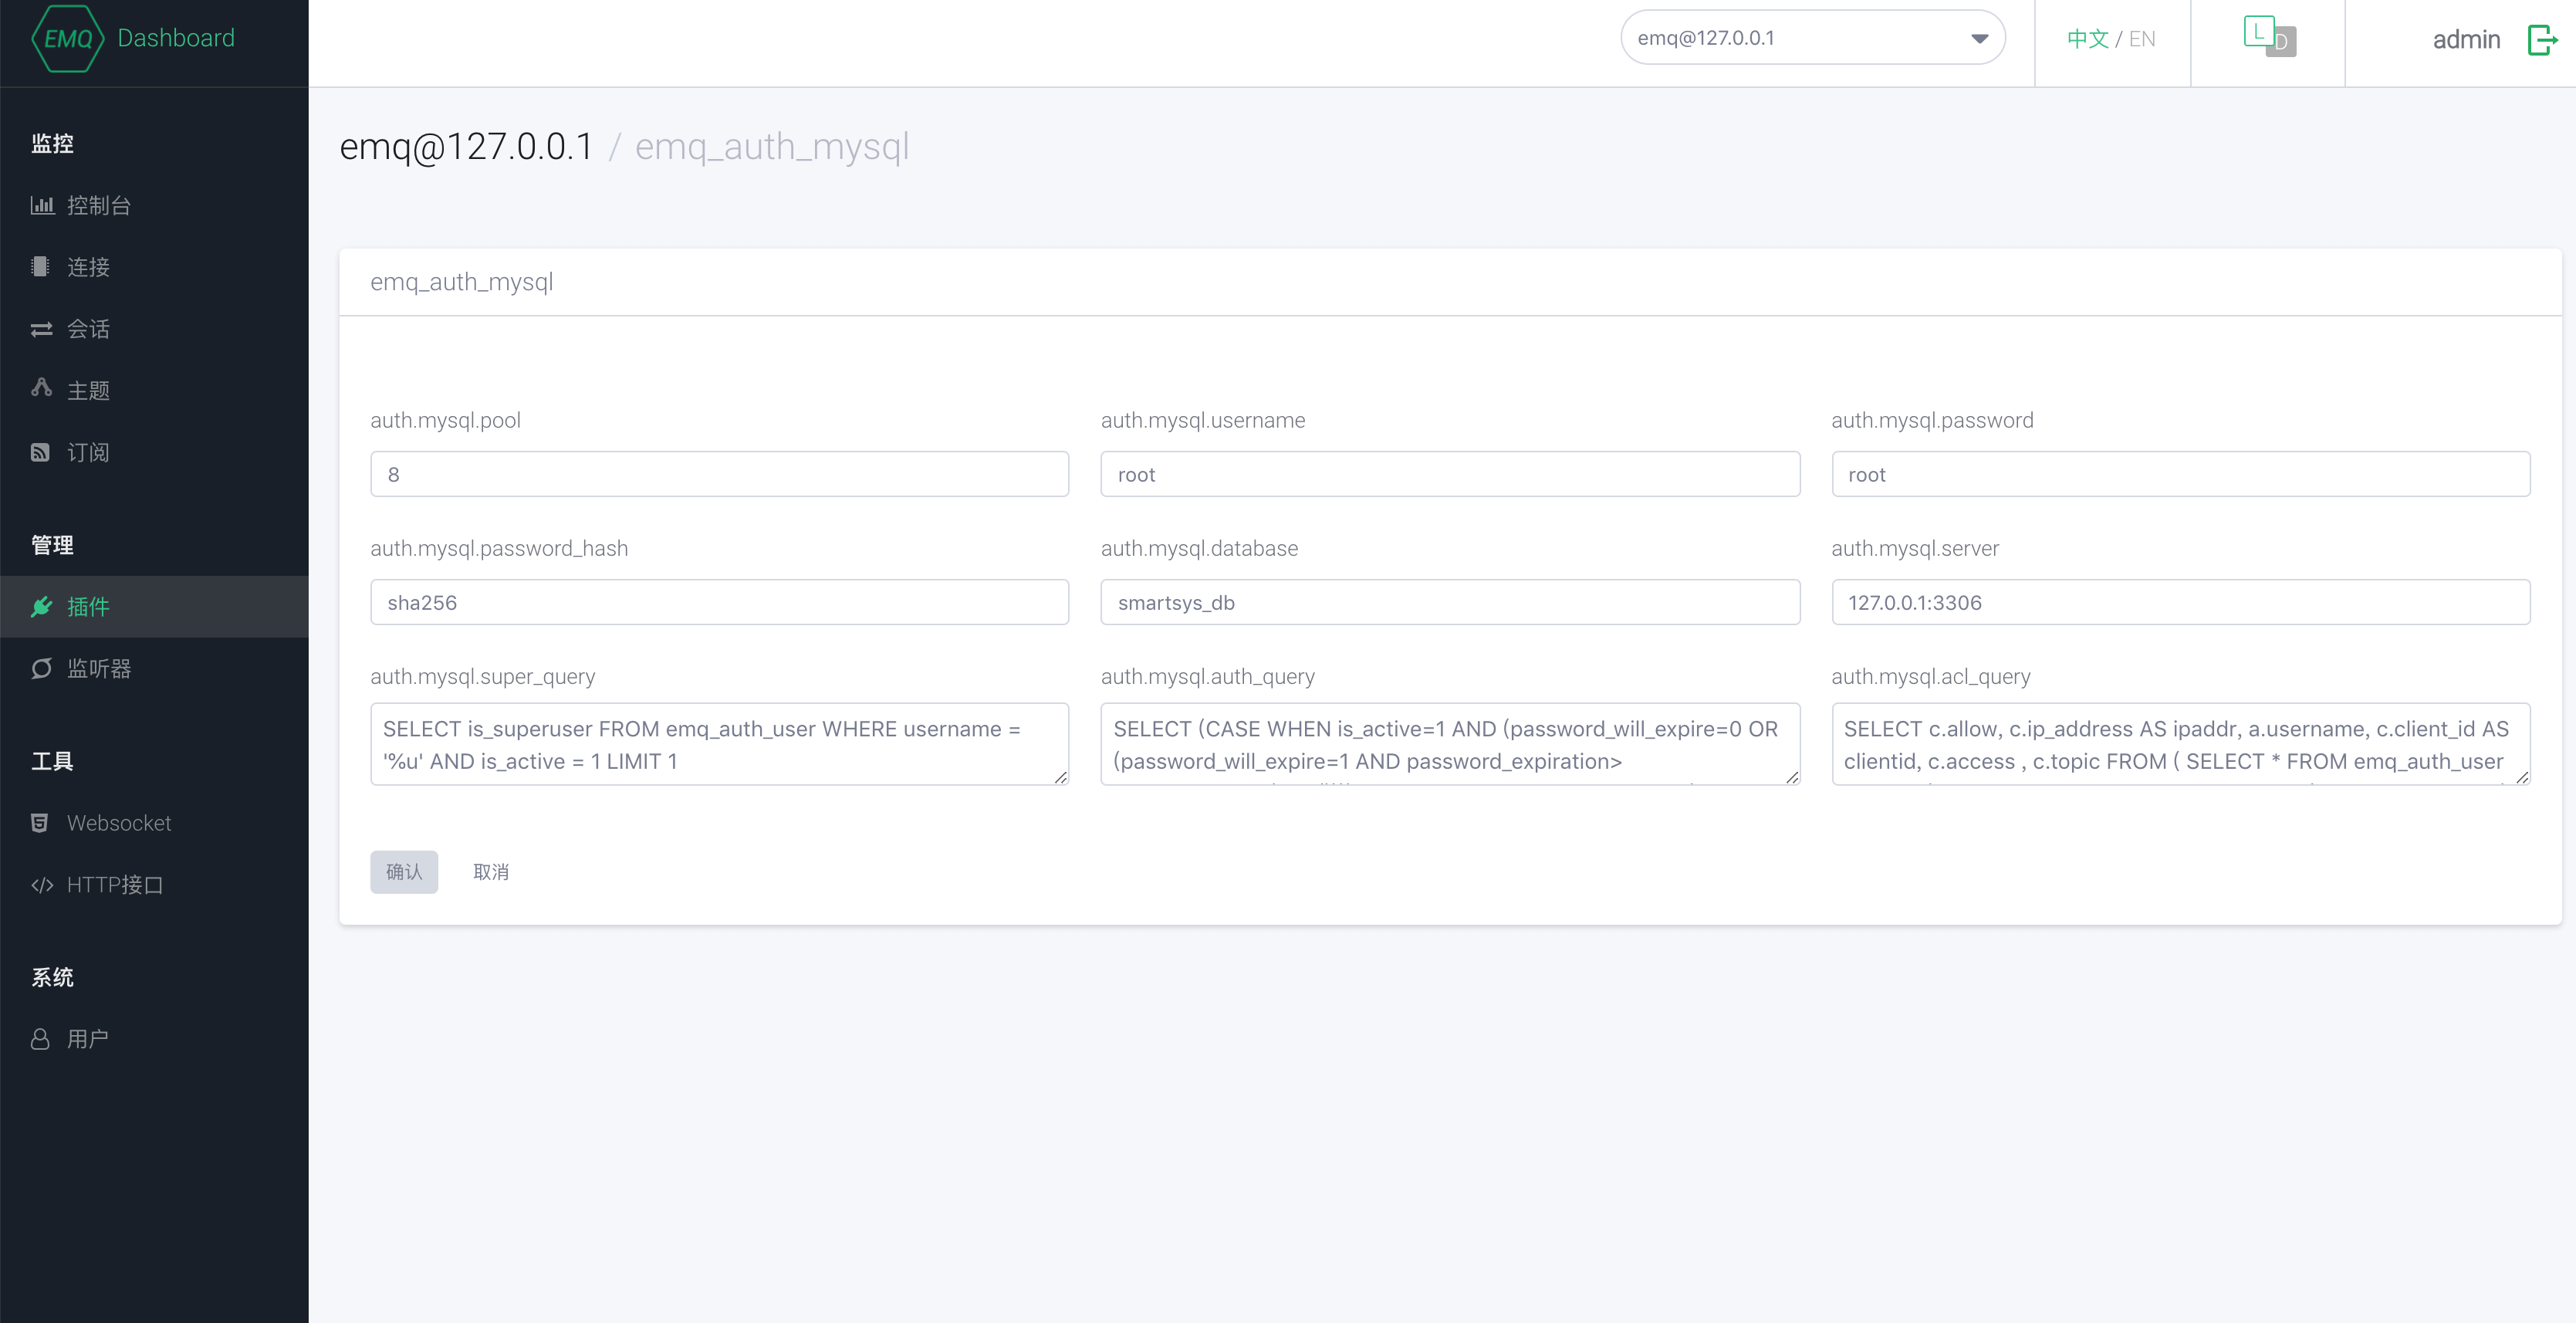 检查配置是否正确。
本片文章只提供改造MySQL鉴权的思路和管理鉴权的方式的思路,以上配置完成后如何使用请读者自行摸索,若有问题可以留言。